Draw a Perfect Circle in Inkscape

Even if you lot don't want to draw this empty-headed reindeer, the following tutorial will teach y'all how to employ several of the free computer cartoon plan Inkscape's tools:
- Learn to Depict a Triangle
- Learn to Work with Layers
- Acquire to Draw a Circumvolve
- Larn to Draw a Rectangle
- Larn to Transform Shapes with Rotate, Flip, & Calibration
- Learn to Use the Guides
- Acquire to Use the Tool Box & the Menu Bar
- Learn to Utilize the Colors Palette in Inkscape
- Learn to Open an Inkspace Work Area
Beginning, yous have to download the Inkscape program. Here
When y'all open the Inkscape program, you will come across the following screen:

Before I exercise anything else, I always get rid of the restrictive box, seen above.
Do this: On the summit menu, go to File and from the Driblet-Down card, Choose Certificate Backdrop.
When the 2d screen appears, UNCHECK Evidence Page Edge.

Voila! I have the entire page, as my work space.

I like to dissever the parts of my computer images into Layers.
Type Shift CTRL-50 and the Layers Card volition appear on the right.
To create a New Layer, click on the + at the bottom of the Layers Menu.
A box volition announced. Blazon a proper name for the new layer in the infinite that says "Layer Name." Name this layer Caput.

Later y'all name the layer, click "Add together"

I like to enlarge the layers menu. Click on the button indicated near the bottom of the right carte.

The layer carte du jour will exist enlarged.

To draw something or edit something, click on the layer where it is positioned or where y'all intend to describe it. The layer will alter from light greyness to blueish. The blue indicates that the layer is selected.
To describe the reindeer's caput, we'll begin past drawing a triangle.
From the card on the left, select the Stars & Polygons Tool.

After the Stars and Polygons Tool has been selected, become to the upper menu and select the Polygon Tool and Set the number of points to 3. Prepare the Spoke ratio to .50

Before you draw, click on a brownish color. I used D45500, which is adjacent to Orangish
With the mouse, elevate a adequately large triangle shape.

From the Tool Box on the Left, choose the Select Tool.

Afterward the Select Tool has been called, click on the Triangle. When you do this, a bounding box will appear effectually it.
To Copy the triangle, Type Shift CRL-D.
Y'all cannot see it, but a second triangle is on pinnacle of the first.

While the triangle is however selected, click on a darker brown color for the height layer. I used 803300
When the arrows look every bit they do in the to a higher place image [with the curved bottom arrows], you can rotate the shape.
We want to change the size of the elevation triangle–nosotros exercise not desire to rotate it.


If the bottom arrow is non vertical, click on the shape again. The arrows volition change.
We want to shorten the triangle.With the mouse, click on the blackness pointer [which appears blue against the dark surface] at the bottom and eye of the triangle and button upward. Hold down the CTRL Key at the aforementioned time, and the triangle will be reduced in relative portions.

Before nosotros add the nose and optics, we demand to understand how to use the guides, which are literally tucked under the rulers that are located at the document's left side, corner, and top.
To admission the guide, hover right at the place where the ruler meets the workspace and pull. A guide should pull out of the ruler. You may accept to endeavour more than once.
The post-obit tutorial shows you how this works: http://inkscapetutorials.org/2014/04/25/working-with-guides-in-inkscape/
Pull a vertical guide from beneath the left ruler and position it in the middle of the triangle. If you lot select the triangle, the black arrows will assistance you position that guide.

Create a new layer above the head layer. Proper noun it Nose.

Choose the circles tool. Select the colour cherry, and depict an oval, to exist a nose. Use the guides to position the nose in the centre.

Create a new layer and proper name it Eyes.
Click on the White Colour Swatch and draw an Center. To create a perfect circle, hold the CTRL Key, while you lot describe.

To create a pupil, depict a smaller circle and make it black.

With the Select Tool, click on the pupil. Shift-Click to besides select the white of the centre. If both are selected, both will have bounding boxes effectually them. With both selected, Type CTRL-D. This volition copy both parts of the eye together. Use the computer's arrow keys. Click the right arrow, until the 2d eye-educatee is in place.

We want to draw a very simple gear up of antlers. Create another layer and Proper name itAntlers. Select the antlers layer. Information technology will turn bluish. Click on the green arrow arrow indicated, until the antlers layer is on the very bottom


Nosotros need to reduce the epitome screen size. You tin do that at the lower right-hand corner.

To reduce the screen size, reduce the numbers-click the drib-down bill of fare.

Earlier we create the antlers, we'll create a groundwork layer that will assistance the antlers be more visible. Create another layer. Name it background. Move it to the lesser of the menu.

Choose the rectangle tool and draw a large, green rectangle below everything.
Now, return to the antlers layer. Select that and draw a narrow, tan antler base across the entire head area.

To assist center the antler base, well hibernate the caput. At that place is an eyeball in front of each layer. Click the eyeball beside the head to shut the eye of that layer and turn off the visibility.

With the Select Tool, click on the antler base shape. Use the arrows to center the antler shape on the center guide.

While the antler shape is still selected, copy it past typing CTRL-D.
On the top Menu bar, choose Object Rotate 90 CW


With the computer's Left arrow key, click until the 2nd rectangle is at the left end of the horizontal antler piece.

We need to brand this shape 50% shorter.
Go to the top menu and choose Object – Transform.
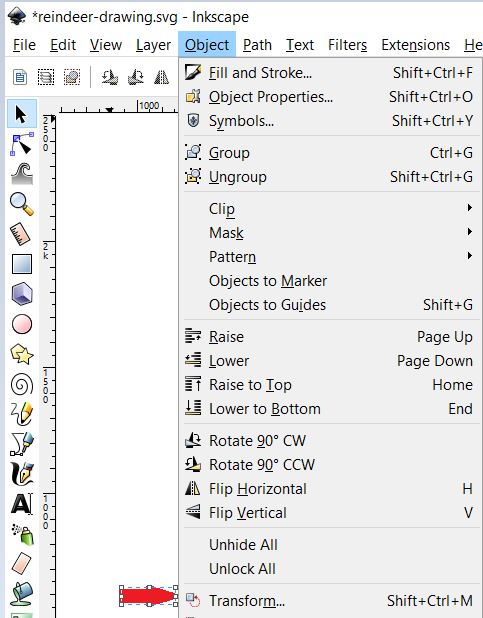
The Transform Menu will open at the top of the Right Card
Choose Scale. Modify the Tiptop to 50%. Click Apply

The vertical rectangle will be l% shorter.

While it is selected, Utilize the Estimator'southward Up Arrow Key to Raise information technology.

Select the vertical bar again. Type CTRL-D to copy it.
While the bar is notwithstanding selected, become back to Object – Transform and Reduce this bar's height l% again.

Now, we are going to Rotate this shortest bar.
Before nosotros do, we need to motion this shortened rectangle's rotation bespeak. Information technology is the + in the center of the rectangle.

Grab the signal with your mouse and drag information technology to the middle of the lesser of the shortened rectangle.

While the shortened rectangle is still selected, get to Object – Transform. In the Transform Carte, Select Rotate. Blazon 45. Click on Apply.

With this rotated rectangle still selected, Type CTRL-D to Re-create Information technology.
Go to Object -Transform – Rotate 135. Click on Utilize.


We want to copy Both of the Angled rectangles. Shift-Click both of them. Type CTRL-D. With the Figurer's Arrow Key Click Up until the second antler pair is in pPlace.

Now, we need to copy the vertical bar and all 4 angled bars. Shift-Click all five rectangles. Blazon CTRL-D to copy. With the Correct Computer Pointer Primal. Click until the second antler is in place.

Now, nosotros'll create some hair. Create a new layer. Be certain information technology is above the Head Layer. Choose the Polygon Tool and draw a light brown triangle.

Nosotros want to narrow this triangle. If the triangle is still selected, you lot should run into arrows like the above. Push one of the center arrows in.
Yous volition copy the narrow triangles several times and rotate each, using the rotating arrow.
 The Rotating Pointer is curved at the bottom. Push one of the curved corner arrows to rotate the shape a bit.
 Proceed playing with this, until you become what you lot want. I created 5 strands of hair and shortened some of the strands. I wanted the hair to be a lilliputian irregular.
With the circle tool, draw a little, blackness oral fissure
With the rectangle tool, create a rectangle the color of the groundwork. Draw that over a flake of the top o the head. This volition deed a flake similar white-out, or light-green-out, if you volition.
At the cease of the projection, you tin either push the guides back beneath the rulers or you tin go to the top carte and click on View – Guides

If you click it again, you will run into the Guides again. When the Check is past the discussion Guides, the Guides are visible.
You can employ rectangles to create a trunk for the reindeer. I copied a few hair strands, to be his tail.

Copyright Jacki Kellum December 15, 2015


Begin by Drawing the Smiley Face Hither
From the Tool Box on the Left, Choose the Stars & Polygons Tool
To select either the Polygon or the Star tool, you have to first select the Stars & Polygons Tool from the Tool Box on the left and also get to the tiptop to the Tool Controls on the upper horizontal bar and specify which of the 2 options that you want.
![]() The Polygons Tool
The Polygons Tool
Use the Polygons Tool to Create Triangles. Enter "3" in Corners Box

Note: If you depict downward, the triangle volition appear every bit information technology does in the above frame. If you depict upwards, the triangle will exist drawn with the point at the superlative.
Before you draw the triangle, select the polygon tool as above and Shift-Click black to ready the Stroke.
From the bottom color palette, choose the color red.
and draw the triangle upward.

To narrow the triangular lid, cull the Select Tool and Select the triangle. A bounding box will appear around the triangle.

Place your mouse on the side, primal bounding arrow and push inward.


With the Hat Triangle Selected, Go to the Top Horizontal Bar, the Menu Bar, Choose the tab Path. From the Drop-Down Carte, Choose Object to Path.

![]() With the lid triangle still selected, choose the Edit Nodes Tool from the Left Tool Box.
With the lid triangle still selected, choose the Edit Nodes Tool from the Left Tool Box.

A group of editing nodes will appear on the chapeau.

While the Edit Nodes Tool is selected, you lot will click on one node at a fourth dimension and pull it into various positions–until you like your hat.


The hat's node between the eyes is a corner node, and at that place is a sharp cornere there. We want to round this line. With the Edit Node Tool still selected, Click on that center node, and go to the upper bar, where you see the options for editing nodes.

Choose the Polish Node

With the Smooth Node chosen, click on the eye node, and the appearance of the line at the bottom of the hat will change.

We can elect to change the other nodes in the same manner.

If y'all change the upper node to a smooth, y'all will see the post-obit change:


If nosotros modify the left side node to a shine, the following will happen:

Since the Smiley's head is colored with a gradient, it only makes sense to also color the lid with a gradient. In the example of the Santa hat, nevertheless, I prefer the hat, without a gradient.

Draw a white circle to exist the fluffy ball at the finish of the cap. Draw a rectangle to brainstorm the fluff around the head.

With the Select Tool, choose the rectangle. On the height menu, select the tab Path and change the rectangle from Object to Path.
Cull the Edit Nodes Tool from the menu on the left.

Click on the top left corner node and make it smooth.

Do the aforementioned thing to the upper right corner node.

Click on the lower right corner and describe that node downwards and inwards. Do the same matter to the lower right corner.

At that place is no node on the lower middle line, just click in that area and nudge the lesser center upward.

I created this entire head in several layers. See the post-obit mail service about using layers in Inkscape Here
To add together a background color, add a layer beneath everything else. Draw a large rectangle there and endeavour filling that rectangle with diverse colors.

Copyright Jacki Kellum December 6, 2015

Links to Posts well-nigh How to Go Started with Inkscape & How to Draw Circles Are at the Bottom
For Review: the Tool Box is on the Left of Your Inkscape Workspace or Sail.
Important Note: Before You Draw the Circle Do iii Things

![]() The Circle Tool is used to create circles, oval, ellipses, wedges, and arcs.
The Circle Tool is used to create circles, oval, ellipses, wedges, and arcs.
Repeat: Before You Draw the Circle Practise the Following 3 Things:
- Click on the Circle Tool in the Tool Box on the Left
- Click on Yellow in Color Swatches at the Bottom
- Shift Click on Blackness [Shift-Clicking Sets the Stroke

 Black is the starting time swatch after Transparent, which is indicated by a white square and a carmine X in it.

iv. When you initially depict the circumvolve, the Stroke is a size 1.
5. Right-Click on the number 1 beside the give-and-take "Stroke", in the bottom right of your screen [below the Tool Box on the Left].

6. Change the Stroke Size to 16

six.![]() Click on the Select Tool. It is found at the acme of the Tool Box, on the left.
Click on the Select Tool. It is found at the acme of the Tool Box, on the left.
7. With the Select Tool chosen, click on the xanthous circle. When the circle is selected, a bounding box will appear around it.
8. With the yellow circle selected, click on the Gradient Tool, which is almost at the lesser of the Tool Box.

![]() The Gradient Tool is used to shade shapes with graduated coloring from color to color and/or from opaque colour to transparency.
The Gradient Tool is used to shade shapes with graduated coloring from color to color and/or from opaque colour to transparency.
9. When you choose the Gradient Tool, you lot will see the Gradient Options in the horizontal horizontal carte du jour at the top. Abreast the word "New" select the second box, which is the Radial Slope.
10. Place your cursor in the middle of the yellow circle and drag downward.

eleven. Because you are creating a radial gradient, y'all volition see a eye finish and a 2d stop [which appears to be two stops that lie at the outer role of the gradient. When you lot starting time draw the gradient, the outer stop is transparent and considering the surface below the circumvolve is white, it will appear that you are gradually adding more than and more white, as you move out of the heart. [You are actually only gradually reducing the amount of xanthous].
12. We'll begin by shifting the colors at the stops. Click on the outer stop and change that color to yellow. The circumvolve volition appear to exist solid yellowish again.

13. Click on the middle stop and change it to white.

14. I want to add together some spice to the gradient. To exercise that, I'll add a third color. To do that, I'll double click in the center of the slope line that extends down.

fifteen. A tertiary slope stop will appear in the center of the line. While the third stop is selected and blue, click on the xanthous swatch.
16. Click on the outer stop [it volition turn bluish]. Change the colour at that outer stop to orange.
17. I want to change where the calorie-free source hits the circle [which is now a sphere–information technology appears to exist 3-d]. Put the mouse cursor on the centre stop and elevate the gradient upward and to the left.

18. I don't desire my Smiley to be quite this orange. Therefore, I'll pull the outer stops outward–outside of the actual circle.

Now it is time to create the eyes
Choose the Circle Tool once more and draw a large circle that it 90% Greyness. That is the swatch next to the black swatch. Considering you created the Smilely's head with a 16 point stroke, the eye may too exist drawn with a stroke. If then, practise the following to remove the stroke.
19. Correct click on the stroke number. Beneath the numbers, you volition see the word "Remove" Click Remove.

20. When you remove the stroke, the eye will be besides minor. With the eye circumvolve selected, click on a corner and pull it outward–to overstate it.

21. We want to indistinguishable the first eye. Choose the Select Tool and Click on the Heart. Blazon: CTRL D [That copies the showtime circle].

22. Nosotros want to motility the first eye left, but nosotros do not desire it to go up or down. Click on the Keyboard Left Arrow Key and continue clicking until, the 2d eye is where you want information technology.

Now it is fourth dimension to create the rima oris
23. Choose the Bezier Tool and Shift Click Black to set the Stroke. Click on 1 side of where the oral cavity will get. While that outset side is however selected, simply move your mouse to where you want the other side of your mouth to be. Double Click to finish the line.

24. With the Select Tool, click on the line and Correct Click on the size of the stroke. Change the stroke size to 16.

25. Choose the Edit Nodes Tool [It is immediately below the Select Tool]. Position your mouse in the center of the mouth'due south line. Drag the center of the rima oris downwardly.
![]() The Edit Node Tool is below the Select Tool.
The Edit Node Tool is below the Select Tool.
 Instructions Copyright Jacki Kellum December 5, 2015

I innovate Circle Editing Here
The post-obit YouTube video illustrates some of those points and farther discusses first to use the Inkscape program.
Important Tip virtually Stroke: You Confine the size to a perfect circle by belongings CTRL.
You choose a Stroke and Its Color by Shift CTRL [+ pick the color]
I introduce the Inkscape workspace Here

For you lot to sympathise this tutorial, you need to consummate Steps ane – 3 Here
Y'all will need to create a new layer and name it Eye-White
In that layer, depict a white circle
Apply a Radieal Gradient

Change the Colors of the Stops

I want to use a squeamish, powdery, periwinkle-blueish to be the shade color.
To access the swatches that y'all see above, become to View on the top carte and from the Drop-Down Card, Select Swatches.

My swatches can exist seen immediately right of my workspace. To run into the choice of swatch types, click on the left-facing arrow that is beneath the x
I accept selected the Inkscape Default Swatches and in the following image, I scrolled through to the dejection.


The above eye gradient goes from white to a periwinkle or cornflower blue.
To create the pupil, I need another new layer, and the Pupil layer needs to be on height.

I drew the pupil with the color that I used to shade the white of the eye.
 This will be the lightest colour of the pupil's gradient.
 Although when I paint, I would not use blackness to practice what I did here, I did add blackness to both of the black stops., and the stops are close together.
 The blue highlight becomes a more authentic gray for the pupil.

Come up right back. I will create the tail adjacent.
Copyright Jacki Kellum Nov 21, 2015


If y'all saved the above SVG, open information technology again in Inkscape. Otherwise, complete Step 1, before Y'all Exercise the Next Step.
Stride 2:
When you created the to a higher place sphere, you probably did so on Layer one.
Because we want to shade all of the chicken separately and for other reasons, we'll create new layers for every role of the chicken'due south body.
To testify Layer 1, Type CTRL Shift 50

In the Layers Menu, Double Click on the Words "Layer 1" and blazon correct on top the following "Body" and press Enter.
We need another layer.
Below the Layers Window, in that location is a +
Click on the +

Change the Name of the 2d layer to Legs

Click on the W0rd "Add together" and the Legs Layer Will be Added on height of the Body Layer.

Cull the Rectangle Tool and Draw a long, sparse Rectangle. Modify the Colour to Orangish.

Choose the Gradient Tool and at the top, choose the first gradient option, which is the Linear pick.

Click on the left side of the rectangle and elevate toward the correct.
Remember that until we change it, we will get a gradient from opaque orange to transparent, which volition seem white.

While the inner handle [or circle] is selected, information technology will be blueish. With that handle selected, cull a reddish for in that location.

To brand the transition less severe, pull the blueish handle outward, to the right.
Choose the Choice Tool and Click on this leg
Type CTRL D [This copies the first leg]
With the Right Pointer Tool on you computer, click until that second leg has shifted to the correct.

Since the light is coming from the upper right, the forepart leg should be lighter in front than in the dorsum. Nosotros must change the gradient color locations.
With the Select Tool, Click on the forepart leg again.
Choose the Gradient Tool once again.
Modify the back slope box to red and the front end bos to orange.
Pull the back box farther into the middle.

Now, our sphere has legs, but I desire the legs to exist behind the sphere.
Manually pull the Legs Layer Below the Body Layer, in the Layer Carte

Save this Step with a Different Name than Yous Titled Pace i.
Next, We'll Create a Beak
Copyright Jacki Kellum Nov 21, 2015
Choose the Circle Tool and Draw a Circle on Yous Workspace.

![]() Choose the Select Tool from the Top of the Tool Box, on the Left.
Choose the Select Tool from the Top of the Tool Box, on the Left.
Click on your Circle
Go Down to the Colour Palette [on the bottom of your page], and change the circle's color to Yellowish.

Now, click on the Gradient Tool
Once the Gradient Tool is selected, go to the upper Options Bar for the Tools, and choose the second choice, the Radial Slope:

Past default, the Slope is designed to go from a transparent color to an opaque ane. On a white workspace, information technology will appear that the colour is going from 1 opaque color to white [as transparency increases, you are seeing the white behind the color that is missing]. We'll brainstorm with this kind of gradient. The further you lot pull the handles out from the circle, the less transparent the gradient will be.
How to Add together the Gradient:
With the Gradient Tool Chosen and with the Radiant Option Chosen, Click in the Center of the Circle and Pull Outward.

In order to take the gradient go from one opaque colour to some other, click i or more of the circles on either of the handles or in the center, and click on another colour in the Color Palette.
The circle that is selected will turn blueish. With the upper circle selected, I clicked on orange. See that gradient below:

By moving the gradient tool around the circle, I tin change how the gradient volition look. In the post-obit example, I am indicating that the sun or the light source is coming from the upper right and hitting the circle where the blue square is shown.

Save you image as an SVG and requite it a name that yous will remember.
An SVG is a Vector Graphic. You can only see it and Edit it in a Vector Cartoon Program, like Inkscape or Adobe Illustrator. Hang with me throughout the day, and I volition show yous how to plough this sphere into a very simple craven and shade each office of the drawing or painting.
Copyright Jacki Kellum November 21, 2o15
Source: https://freeimageeditors.wordpress.com/tag/how-to-create-circles-in-inkscape/
0 Response to "Draw a Perfect Circle in Inkscape"
Post a Comment